FIDO2 Hardware Authenticators and Operating System Logins
Teetje Stark

FIDO2 Hardware Authenticators and Operating System Logins
Passwords are conceptually simple, yet bad passwords are a security issue, while strong passwords aren’t great to use. FIDO2 (Fast Identity Online 2) is an authentication standard that promises to remedy both problems simultaneously. Better usability through a password- less setup and more security through phishing-resistant technology are just two ways it can improve login flows.
FIDO2 credentials exist in various forms, from passkeys integrated into operating systems to hardware authenticators with NFC support and biometric sensors. With an increasing num b er of websites supporting the standard, authenticators can b e used more and more. One lesser- known use case specific to hardware authenticators is that various operating systems support them during device login. This b log post will dive into how logins to Linux systems with hardware authenticators can b e achieved via Pluggable Authentication Modules (PAM) and how to enable security key support in Windows. For both OSs, I will provide step-by-step guidance, highlight potential pitfalls, and discuss security implications for different options. The focus will b e on how an administrator can configure their device, keeping fleet management out of scope. Before detailing the required steps, here’s some background and terminology on the FIDO2 system.
Short overview of FIDO2
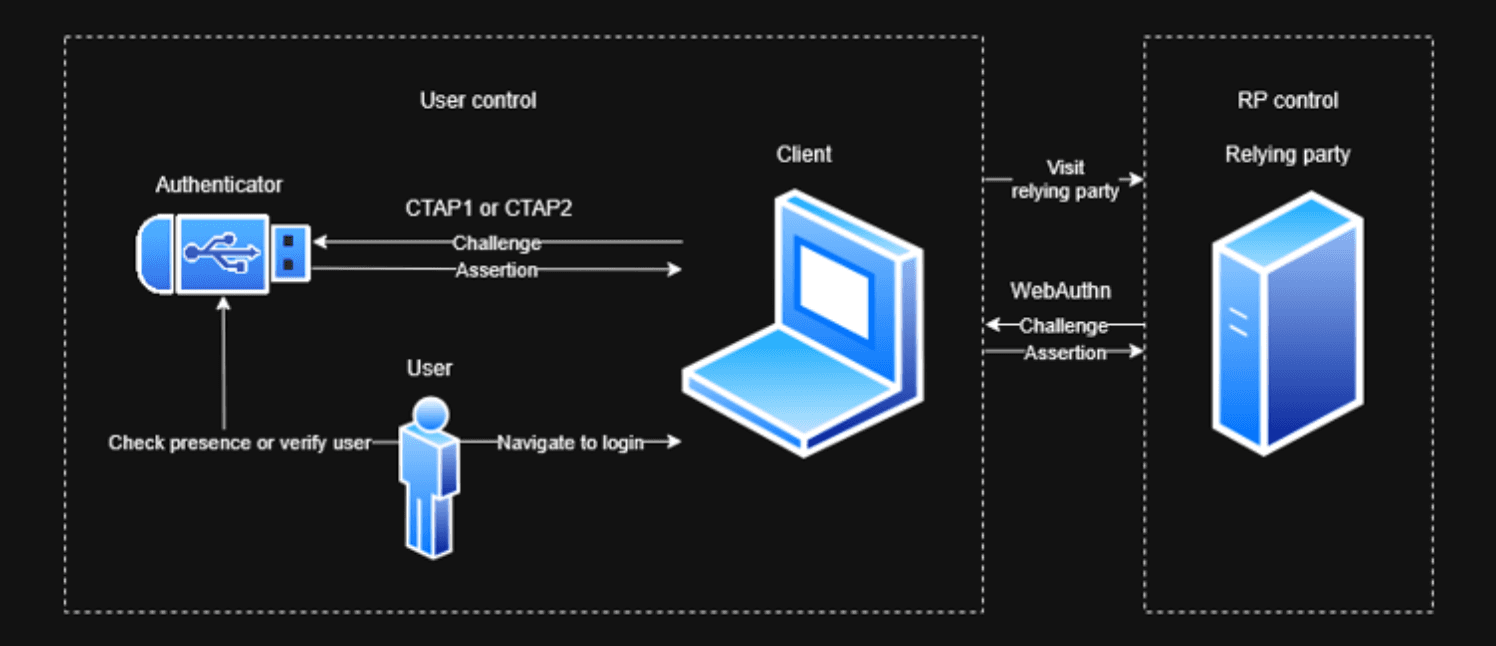
Overview of the FIDO2 system
FIDO2 involves a few different entities. Central parties are the user and the relying party, the latter of whom wants to authenticate the former. To that end, the relying party generates a challenge and sends it through the user's client (which might be the OS or browser, for example) to an authenticator. The authenticator locally authenticates the user and generates an authentication assertion by signing data, including the challenge, with a credential key pair's private key portion. The assertion is then transmitted through the user's client to the relying party, which can check it.
The private key never leaves the authenticator and isn't even exposed to the user. Each credential key pair is bound to a relying party identifier, which, in the web context, is the relying party's domain. The client can ensure that a relying party can only request authentication assertions for credential key pairs that match its domain. Through the combination of both, a credential key pair can neither be leaked nor misused in the wrong context, making it phishing-resistant. This constitutes the most significant advantage of FIDO2 authentication over passwords.
Depending on the configuration of the relying party and authenticator, the latter can add security on top of passwords, substitute them for password-less logins, or even create username-less logins in which the authenticator hosts a discoverable credential including the user identifier. Where the earlier U2F standard from 2014 knew the concept of user presence – is any user present? – the more recent FIDO2 standard from 2018 features the notion of user verification, meaning the authenticator can identify the correct user from who they are or what they know.
The FIDO2 standard comprises the Client to Authenticator Protocol (CTAP) in version 2 and Web Authentication (WebAuthn). Communication between client and authenticator is described in the former, while the latter specifies an API that allows relying parties to authenticate users in the web context.
With this introduction to the terminology of the FIDO2 standard, the subsequent sections dive into the details of how to leverage it to authenticate against operating systems.
Linux
The below instructions work for an Ubuntu 24.04.2 system with root access but should apply similarly to other Linux systems. Notable differences are on systems that don't use the common-auth file for their Pluggable Authentication Modules (PAM) configuration but rather the system-auth or password-auth files. If these files are managed by authselect instead of pam-auth-update, directly manipulating the files will not work. Instead, you'll have to work with authselect profiles.
For Linux, the integration with the authenticator works via Pluggable Authentication Modules (PAM). These modules allow customizing the login flows. In particular, the pam-u2f module allows interacting with hardware authenticators.
Following the Yubico guide, install libpam-u2f (Despite its name, the module not only supports U2F but also FIDO2 authenticators.) in a recent version using:
# adding PPA is required on Ubuntu <= 24 to get secure version >=1.3.1
# for Ubuntu 25, the maintained package version is >=1.3.2 already
sudo add-apt-repository ppa:yubico/stable
sudo apt update
sudo apt install -y libpam-u2f
# adding PPA is required on Ubuntu <= 24 to get secure version >=1.3.1
# for Ubuntu 25, the maintained package version is >=1.3.2 already
sudo add-apt-repository ppa:yubico/stable
sudo apt update
sudo apt install -y libpam-u2f
# adding PPA is required on Ubuntu <= 24 to get secure version >=1.3.1
# for Ubuntu 25, the maintained package version is >=1.3.2 already
sudo add-apt-repository ppa:yubico/stable
sudo apt update
sudo apt install -y libpam-u2f
After inserting the authenticator, you can generate the credential key pair using the below command. You might be asked to enter your authenticator's PIN and might need to touch it.
pamu2fcfg | tee fido2_keys
pamu2fcfg | tee fido2_keys
pamu2fcfg | tee fido2_keys
pamu2fcfg defaults to requesting user presence on login, but not user verification. If a higher security level is to be imposed for this specific authenticator, you can change it. pamu2fcfg --pin-verification will require PIN entry, while pamu2fcfg --user-verification requires biometric verification.
The result is something like
testa:mq8v8Cg31wAheRwyS2fP108/fsbZVNoXYzKBkGfDl2g2ylTW3olxtavtSQLTFM5nJJT1W+8RFJAe/C0zZaTVYg==,44nL7uUYKUeSO33Lc2lIUhBXpGc7XznTHqG3i+fS0WE6AN5FdIJGIyEbtGJD1uDiWzRfAJ/eiTQkAf6qPoa93A==,es256,+presence
Here is a breakdown of the above:
testais the Linux username for whom the following set of keys and options will apply.mq8v8Cg31wAheRwyS2fP108/fsbZVNoXYzKBkGfDl2g2ylTW3olxtavtSQLTFM5nJJT1W+8RFJAe/C0zZaTVYg==is the (base64-encoded) key handle that helps the authenticator to identify which key to use. For YubiKeys, the key handle is the encrypted private key and origin (the origin defaults topam://<$HOSTNAME> when calling pamu2fcfg).44nL7uUYKUeSO33Lc2lIUhBXpGc7XznTHqG3i+fS0WE6AN5FdIJGIyEbtGJD1uDiWzRfAJ/eiTQkAf6qPoa93A==is the (base64-encoded) public key corresponding to the private key identified by the above key handle.es256is the signature algorithm used to verify the authentication assertion with the above public key.+presenceindicates that the authenticator must ensure user presence before being used. Similarly,+pinor+verificationsignal that PIN entry or another form of user verification must be performed, respectively. A combination of the above is possible but not required. For example,+presence+pinrequires both a touch and PIN entry. On the other hand, +pin (and a corresponding configuration ofuserpresence=0of the PAM configuration) only requires PIN entry and skips the presence check.
Note that you can configure multiple authenticators per user and multiple users per file. Keys for different users are set on separate lines. Multiple keys for the same user share the same line and are separated by a colon.
testa:mq8v8Cg31wAheRwyS2fP108/fsbZVNoXYzKBkGfDl2g2ylTW3olxtavtSQLTFM5nJJT1W+8 RFJAe/C0zZaTVYg==,44nL7uUYKUeSO33Lc2lIUhBXpGc7XznTHqG3i+fS0WE 6 AN5FdIJGIyE b tGJD1uDiWzRfAJ/eiTQkAf6qPoa93A==,es256,+presence:0xOThEdoIRHSNh9ZU07XpQrs48yp Y7IUijaWznGoWHoY30sjg6ICbWYe bUR4CNzfN/0ZT4nZFrEIMBP1/zJRA/iKCPnfPJZajiIzwGjw5 L ba/P8RoYh9EPFABeC2FzC7j3lEMQFDVPeJ9gBWKmp3ZkeG7gzh9cZYas9pmsR8TJU=,erc46o D9i9FC6mWNgyzv2e b1MP0TlEBu1GFEEsU1Zws=,eddsa,+presence+pin
You should secure the authentication file and move it to a more general location (While a subfolder of the user's home folder is the default for pam-u2f, features like encrypted home folder can break the PAM config. Additionally, this allows for a central definition of authentication instead of it being scattered across all users.).
chmod 644 fido2_keys
sudo chown root:root fido2_keys
sudo mkdir -p /etc/fido
sudo mv fido2_keys /etc/fido/fido2_keys
chmod 644 fido2_keys
sudo chown root:root fido2_keys
sudo mkdir -p /etc/fido
sudo mv fido2_keys /etc/fido/fido2_keys
chmod 644 fido2_keys
sudo chown root:root fido2_keys
sudo mkdir -p /etc/fido
sudo mv fido2_keys /etc/fido/fido2_keys
At this point, you have created an authentication file that mostly describes a mapping between users and keys. To put it into action, you need PAM to invoke the pam-u2f module and request authentication through the authenticator.
Configure PAM to require MFA
⚠ This is the beginning of the danger zone. A misconfigured PAM service can block all logins or allow them with insufficient checks, leaving your device inaccessible or insecure.
The first thing to secure will be the graphical interface. For Ubuntu 24, this is the GNOME Display Manager (GDM). In the beginning, the scope of changes will be limited to this service. Later, it will be expanded to other services as well.
The PAM configuration for regular password entry of GDM is located under /etc/pam.d/gdm-password and looks something like this:
auth        requisite     pam_nologin.so
auth        required      pam_succeed_if.so user != root quiet_success
@include common-auth
auth        optional      pam_gnome_keyring.so
@include common-account
# SELinux needs to be the first session rule. This ensures that any
# lingering context has been cleared. Without this it is possible
# that a module could execute code in the wrong domain.
session  [success=ok ignore=ignore module_unknown=ignore default=bad]  pam_selinux.so close
session  required   pam_loginuid.so
# SELinux needs to intervene at login time to ensure that the process
# starts in the proper default security context. Only sessions which are
# intended to run in the user's context should be run after this.
# pam_selinux.so changes the SELinux context of the used TTY and configures
# SELinux in order to transition to the user context with the next execve() call.
session  [success=ok ignore=ignore module_unknown=ignore default=bad]  pam_selinux.so open
session  optional   pam_keyinit.so force revoke
session  required   pam_limits.so
session  required   pam_env.so readenv=1
session  required   pam_env.so readenv=1 user_readenv=1 envfile=/etc/default/locale
@include common-session
session  optional   pam_gnome_keyring.so auto_start
@include common-password
Explaining the details of PAM is beyond the scope of this blog post, but TecMint has a great introduction. Regarding authentication, most logic resides in the @include common-auth statement, which includes checking the user-provided password (and can be seen in /etc/pam.d/common-auth).
To enable multi-factor authentication for the graphical login using the authenticator, add the following line in /etc/pam.d/gdm-password below @include common-auth:
auth required pam_u2f.so authfile=/etc/fido/fido2_keys cue
auth required pam_u2f.so authfile=/etc/fido/fido2_keys cue
auth required pam_u2f.so authfile=/etc/fido/fido2_keys cue
Breaking down the line:
authspecifies the PAM management group, here authentication, meaning that the module is loaded to take part in the authentication decision for the user.requiredmeans that the module must pass for successful authentication (but subsequent modules, e.g., for logging, will still run).authfile=/etc/fido/fido2_keysdeclares that the authentication file is located at/etc/fido/fido2_keys.cueis a helpful flag that causes prompts to touch the authenticator to appear when necessary.
If you want to be prompted to insert the authenticator each time authentication takes place (including when the authenticator is already inserted), set the interactive flag. Personally, I find it a bit annoying and thus leave it out, knowing I need to touch the authenticator. In shared systems, this might offer reasonable UX, though.
After adding the line, log out of your user and log in again. First, you will be prompted for a password, then (if the authenticator is plugged in) for a touch. Depending on your authenticator configuration, some form of user verification might be required, too (TODO footnote: If you have multiple authenticators with different capabilities and you want to insist on one while requiring at least some form of user verification, you can do something like ). Failing to insert or touch the authenticator will lead to an authentication failure.
auth [success=1 default=ignore] pam_u2f.so authfile=/etc/fido/fido2_keys cue userverification=1
auth required pam_u2f.so authfile=/etc/fido/fido2_keys cue pinverification=1
auth [success=1 default=ignore] pam_u2f.so authfile=/etc/fido/fido2_keys cue userverification=1
auth required pam_u2f.so authfile=/etc/fido/fido2_keys cue pinverification=1
auth [success=1 default=ignore] pam_u2f.so authfile=/etc/fido/fido2_keys cue userverification=1
auth required pam_u2f.so authfile=/etc/fido/fido2_keys cue pinverification=1
The resulting setup constitutes a two-factor authentication. However, it is limited to the GUI login process. For example, running su to change to another user will prompt for a password and succeed without the authenticator, as /etc/pam.d/su wasnʼt altered. The same goes for login and other programs that allow logging in or changing the user.
This is where it gets complicated. You either add the line requiring the authenticator to all appropriate modules in the /etc/pam.d/ directory (which are lots), or you add it to the common-auth file, effectively requiring authenticators whenever standard authentication takes place. The latter might seem like a good idea, but it precludes remote authentication. For example, /etc/pam.d/sshd also includes common-auth. Since pam_u2f.so works on the local device, it cannot interact with authenticators on a remote machine, thus breaking SSH logins. If only local logins are used, editing /etc/pam.d/common-auth instead of all files individually is a good (and future-proof) solution, though (make sure to edit the lines below the pam-auth-update config block managed by pam-auth-update).
Enable passwordless login
Instead of adding a second factor to the login flow, you can use PAM to create a passwordless authentication experience. To do so, remove the require statement from the previous section and add the following in /etc/pam.d/common-auth:
auth sufficient pam_u2f.so authfile=/etc/fido/fido2_keys cue userverification=1
auth sufficient pam_u2f.so authfile=/etc/fido/fido2_keys cue pinverification=1
auth sufficient pam_u2f.so authfile=/etc/fido/fido2_keys cue userverification=1
auth sufficient pam_u2f.so authfile=/etc/fido/fido2_keys cue pinverification=1
auth sufficient pam_u2f.so authfile=/etc/fido/fido2_keys cue userverification=1
auth sufficient pam_u2f.so authfile=/etc/fido/fido2_keys cue pinverification=1
This states that a successful authentication with the authenticator is sufficient to authenticate the user. Any subsequent checks (such as password entry) are skipped. In this configuration, either biometrics (userverification) or PIN entry (pinverification) is required to ensure physical possession of the authenticator alone is not enough to log in (e.g., in case the laptop and authenticator were stolen at the same time).
Note that requiring both userverification and pinverification doesnʼt lead to better security. PIN verification, by definition, is a form of user verification. Thus, you cannot check for both biometrics and PIN. Instead, if pinverification and userverification are set, the PAM module will require the PIN and accept any touch, yet fail on a wrong PIN regardless of biometrics. However, authenticators that donʼt support biometrics would always fail with both options set. Thus, the above snippet allows biometric authenticators to work, permits fallback to PIN entry, and simultaneously enables authenticators without biometrics support to skip to PIN verification immediately.
If user presence alone should be sufficient, simply use:
auth sufficient pam_u2f.so authfile=/etc/fido/fido2_keys cue userpresence=1 userverification=0 pinverification=0
auth sufficient pam_u2f.so authfile=/etc/fido/fido2_keys cue userpresence=1 userverification=0 pinverification=0
auth sufficient pam_u2f.so authfile=/etc/fido/fido2_keys cue userpresence=1 userverification=0 pinverification=0
instead (TODO footnote: There are three separate configurations:
1) The central PAM module config in etc/pam.d/ can require user verification with pinverification=1 or userverification=1 across all users;
2) The configured authentication file (in this case, etc/fido/fido2_keys) can require user verification with +pin or +verification per credential;
3) The authenticator itself can have a boolean toggle, Always Require User Verification, which can also require user verification. If either of the three configurations mandates it, user verification will be needed for authentication to succeed.).
One thing to note is that the order of modules matters. Since sufficient ends in immediate success (for its management group, in this case, auth), this skips later checks as well, such as whether the user('s password) is locked, which is part of auth management in pam_unix (the standard PAM module for password authentication). Then, an account locked with usermod -L or passwd -l could still log in. On the other hand, expiry checks still apply as theyʼre part of the account management of pam_unix, which executes as part of a different PAM management group (TODO footnote: In GDM, this holds except if there is an existing session.).
Windows
The below instructions work on an Entra-joined Windows 11 Pro 24H2 with administrative privileges but should work similarly for Windows 10. Note that security key support for login is limited to joined devices (e.g., Entra joined).
For Windows, you need a Microsoft work or school account with an authenticator as an authentication method. Unfortunately, using local accounts or personal Microsoft accounts is not supported.
FIDO2 support needs to be enabled at the tenant level. In the Entra Admin center, go to Protection → Authentication methods → Policies and enable “Passkey (FIDO2)” as an authentication method.
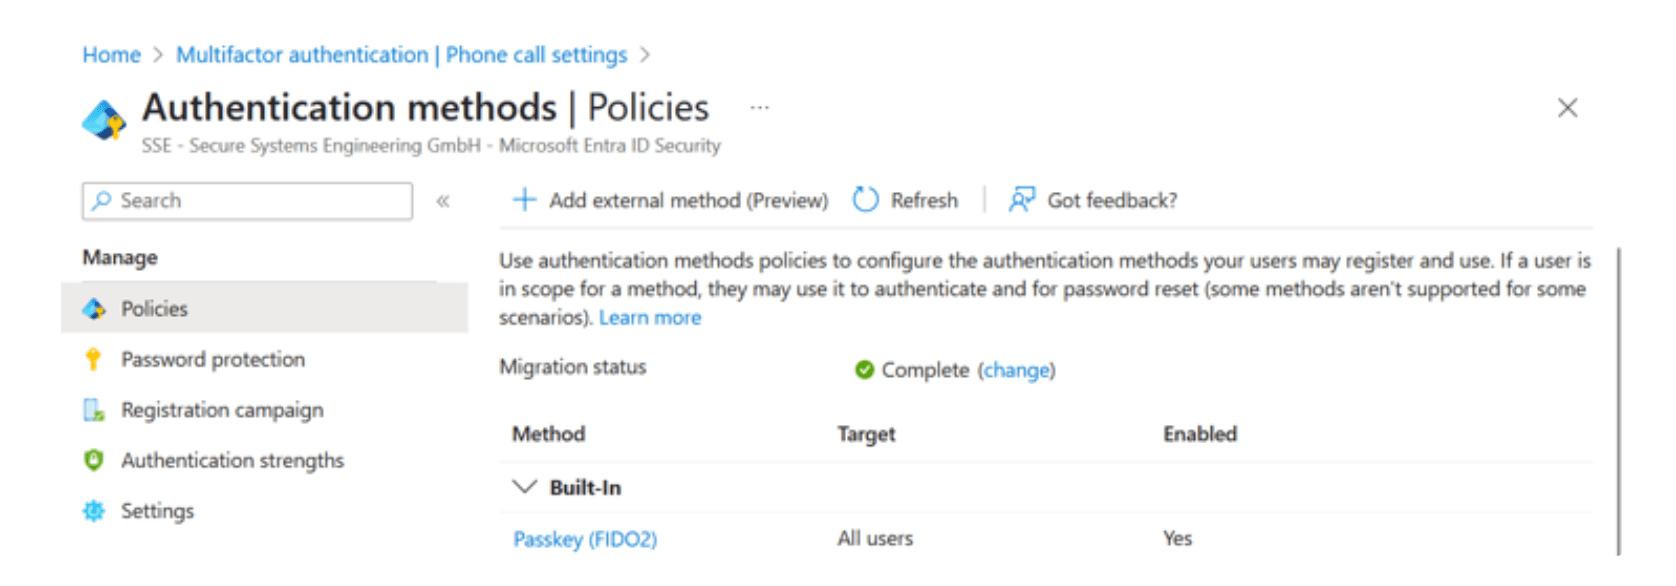
Authentication methods in the Entra admin center
Afterward, you can enroll an authenticator in your account at the Security info tab of your Microsoft account page for a work account. If you have a personal account, go to the security page of your personal Microsoft account, choose "Manage how I sign in", and set up an authenticator. Either creates a discoverable credential on your authenticator. In contrast to Linux PAM, which sets the relying party ID to the pam scheme plus local hostname, Microsoft uses its domain in the web context, with the relying party ID set to login.microsoft.com.
At this point, you have a Microsoft account that supports authentication with FIDO2. However, thatʼs not enough to use an authenticator to log in to Windows. By default, this authentication method is disabled.
To allow FIDO2 login for your Windows machine, enable the setting Computer Configuration → Administrative Templates → System → Logon → Turn on security key sign-in in the Local Group Policy Editor. Alternatively, you can run the following command in an admin PowerShell:
reg add HKLM\SOFTWARE\Policies\Microsoft\FIDO /v EnableFIDODeviceLogon /t REG_DWORD /d 1 /f
reg add HKLM\SOFTWARE\Policies\Microsoft\FIDO /v EnableFIDODeviceLogon /t REG_DWORD /d 1 /f
reg add HKLM\SOFTWARE\Policies\Microsoft\FIDO /v EnableFIDODeviceLogon /t REG_DWORD /d 1 /f
(or manually set the Windows Registry entry
HKEY_LOCAL_MACHINE\SOFTWARE\Policies\Microsoft\FIDO\EnableFIDODeviceLogon to DWORD value 1).
You can now try to log in with the security key (Windows key + L → Sign-in options). Windows defaults to the last authentication method used, so once you use a security key, the login screen will default to using it until you use another method.
As you can see, there isnʼt much config to be done. Windows requires user verification and adds the authenticator as an option alongside, not in addition to, other options. Thus, you get an MFA option (being in possession of the authenticator and having the knowledge of its PIN or being the user matching the enrolled biometrics).
If you wanted to enforce this flow, you'd need to disable other login options. You could do this by adding them to the Group Policy option Computer Configuration → Administrative Templates → System → Logon → Exclude credential providers or adding a Disabled DWORD with value 1 to the respective credential provider in the registry under HKEY_LOCAL_MACHINE\SOFTWARE\Microsoft\Windows\CurrentVersion\Authentication\Credential Providers\.
Removing cached credentials
One thing to note is that Windows keeps a cache of credentials on file to log into a previously logged-in Microsoft account while offline. As is the nature of a cache, it can become stale, e.g., if the user's password changes or a security key gets removed from the Microsoft account. While you can force Windows to refresh your cached password by entering the new one, you can't refresh a security key, as it doesn't have a "successor". If you want to force-clear the cache, Windows doesn't aid you. Removing the container with Windows Hello credentials doesn't suffice to invalidate a cached FIDO2 credential. Updating parts of the cache, for example, by changing the password and inputting the new one, doesn't work. Waiting a few days might not work. Windows is pretty stubborn when it comes to caching your outdated (stolen?) security keys.
After lots of digging, I found where these credentials are stored:%SYSTEM32%\config\systemprofile\AppData\Local\Microsoft\Windows\CloudAPCache\AzureAD\<$SOME_HASH_OF_YOUR_UPN>\Cache\CacheData
Removing this file (which requires SYSTEM permission) and signing in again with an active internet connection leads to a complete cache reset, invalidating any revoked authenticators. Alternatively, authenticators also appear below: HKEY_LOCAL_MACHINE\SOFTWARE\Microsoft\IdentityStore\LogonCache\B16898C6-A148-4967-9171-64D755DA8520\Alias2Name\in the registry, where you could remove the corresponding entries. The mapping between the authenticator and AliasHash seems to be deterministic. However, I didn't find out what it is, so removing the authenticator surgically required trial and error.
Regardless of how you clear the cached security key, ensure that you do when you retire a lost or otherwise compromised security key for your Microsoft account.
Security considerations
As alluded to in the previous sections, turning different kno bs will lead to different outcomes in terms of security. Just exposing the option without it getting used will reduce security by increasing the attack surface. However, for one, some attacks like observing a password being entered are just not possible when security keys are used opportunistically, and, with improved UX in the regular case (e.g., login with authenticator and PIN), the security requirements in fall back scenarios can b e stricter (e.g., the account password can b e very long).
You can enforce the login via authenticator by removing all other options. While the security benefits of authenticators in the context of websites are indisputable, a verdict may b e more nuanced if the threat model includes local attackers, as might b e the case for an operating system login.
If there’s no user verification at all, e.g., a simple touch on the authenticator is required, attackers with access to the authenticator will succeed easily and protection of the OS becomes protection of the physical authenticator. In case user verification is required, it comes down to setup. A weak PIN that a coworker can easily shoulder-surf and an authenticator left unattended on bathroom breaks will likely lessen security, whereas biometric verification and meticulous care in taking the authenticator with oneself improve security. In the end, despite any technical measures, security always depends on the end user.
On the other hand, adding the authenticator on top of existing security mechanisms obviously increases the system's security.
Whatever you decide for your setup, authenticators can be a great addition to your login to the operating system, both in terms of security and usability. Have fun testing and stay safe!
© SSE – Secure Systems Engineering GmbH
© SSE – Secure Systems Engineering GmbH